Lincoln Nautilus: Bumpers / Front Bumper Cover. Removal and Installation
Lincoln Nautilus 2018-2025 Service Manual / Body and Paint / Body and Paint / Bumpers / Front Bumper Cover. Removal and Installation
Removal
NOTE: Removal steps in this procedure may contain installation details.
-
Remove the front wheel and tire assemblies.
Refer to: Wheel and Tire (204-04A Wheels and Tires, Removal and Installation).
-
Remove the front fender moulding.
Refer to: Front Fender Moulding (501-08 Exterior Trim and Ornamentation, Removal and Installation).
-
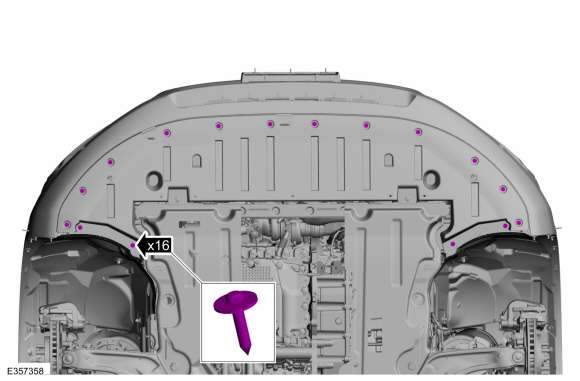
Remove the fender liner to radiator closeout screws.
Torque: 18 lb.in (2 Nm)
 |
-
Remove the bolts, the push pins and the radiator closeout panel.
Torque: 27 lb.in (3 Nm)
.jpg) |
-
On both sides.
Remove the push pins, the nuts and position the front of the fender liner aside.
Torque: 18 lb.in (2 Nm)
.jpg) |
-
Disconnect the front bumper cover wiring harness electrical connectors.
.jpg) |
-
On both sides.
Remove the front bumper cover bracket bolts.
.jpg) |
-
Remove the push pins and the radiator sight shield.
 |
-
-
Remove the screws and release the tabs.
Torque: 44 lb.in (5 Nm)
-
Disengage the alignment tabs on the outside edges of the radiator grille.
-
Release the clips and position the front bumper cover forward.
-
Remove the screws and release the tabs.
 |
-
If equipped.
Disconnect the front camera washer hose.
 |
-
With the help of an assistant.
Remove the front bumper cover.
 |
Installation
All vehicles
-
To install, reverse the removal procedure.
-
If replacing the front bumper cover,
Carry out the azimuth and elevation system checks.
Refer to: Azimuth System Check (413-13C Parking Aid - Vehicles With: Active Park Assist, General Procedures).
Refer to: Azimuth System Check (413-13A Parking Aid - Vehicles With: Rear Parking Aid, General Procedures).
Refer to: Elevation System Check (413-13A Parking Aid - Vehicles With: Rear Parking Aid, General Procedures).
-
If any sensor fails the check, diagnose the sensor fault.
Refer to: Parking Aid (413-13C Parking Aid - Vehicles With: Active Park Assist, Diagnosis and Testing).
Refer to: Parking Aid (413-13A Parking Aid - Vehicles With: Rear Parking Aid, Diagnosis and Testing).
Vehicles equipped with 360° camera only.
-
Align the 360° camera.
Refer to: 360 Degree View Camera Alignment (413-13B Parking Aid - Vehicles With: Parking Aid Camera, General Procedures).
 Front Bumper. Removal and Installation
Removal
NOTE:
Removal steps in this procedure may contain installation details.
All vehicles
Remove the front bumper cover.
Refer to: Front Bumper Cover (501-19 Bumpers, Removal and Installation)...
 Rear Bumper. Removal and Installation
Removal
NOTE:
Removal steps in this procedure may contain installation details.
All vehicles
Remove the rear bumper cover.
Refer to: Rear Bumper Cover (501-19)
...
Other information:
Lincoln Nautilus 2018-2025 Owners Manual: Cleaning the Exterior. Waxing
Cleaning the Exterior Cleaning Headlamps and Rear Lamps We recommend that you only use cold or lukewarm water containing car shampoo to clean the headlamps and the rear lamps. Do not scrape the lamps. Do not wipe lamps when they are dry. Cleaning Windows and Wiper Blades To clean the windshield and wiper blades: Clean the windshield with a non-abrasive glass cleaner...
Lincoln Nautilus 2018-2025 Service Manual: Driver Front Seat Module (DSM). Removal and Installation
Removal NOTE: DSM shown, SCMB (front passenger seat control module) is similar. NOTE: Removal steps in this procedure may contain installation details. All vehicles NOTE: This step is only necessary when installing a new component...
Categories
- Manuals Home
- 1st Generation Nautilus Owners Manual
- 1st Generation Nautilus Service Manual
- Opening the Liftgate
- Anti-Theft Alarm System Settings. Security – Troubleshooting
- USB Ports
- New on site
- Most important about car
Opening and Closing the Hood
Opening the Hood

Copyright © 2025 www.linautilus.com